Wednesday, September 2, 2015

Maple Mustard Salad Dressing

Maple Mustard Salad Dressing
This salad dressing is delicious and smooth with just the right amount of heat from stone ground mustard. Perfect for tossed green salads, or drizzled over sliced garden tomatoes and fresh mozzarella cheese with a bright green flourish of chiffonaded basil leaves. 

Makes 1 scant cup of dressing. 

Measure all ingredients directly into a pint jar with a tight-fitting lid.

6 Tablespoons of good quality extra virgin olive oil (you have to like the taste of it all on its own)
5 Tablespoons of balsamic vinegar (also it's good if you like the taste of this on its own)
1 Tablespoon maple syrup
1 Tablespoon stone ground mustard (I like Maille brand)
1/2 tsp salt
Pepper to taste

Fit lid onto jar tightly, and shake until dressing is well emulsified and smooth. 

Saturday, November 9, 2013

Chocolate Clusters

When I was young, my mother gave me a lot of liberty in our kitchen. I was given nearly free rein to cook, bake, experiment, and try whatever new recipes interested me. Through this process, I learned what I liked and what I didn't like. And if I didn't like something, I would simply make it again, but with a little this or that added. My tastes evolved, my cooking skills improved, and now my mother prefers when I cook, even though she is a fine home cook herself! However, there are a handful of dishes that both my mom and my dad prepared regularly that have stuck with me, either as unchangeable classic tastes that remind me of home, or as inspiration for me to develop a more grown-up version of a childhood favourite.

Chocolate clusters fall into the second category. I remember the recipe my mom used very clearly: She would melt 1 bag of butterscotch chips and 1 bag of semi-sweet chocolate chips in an oversized glass measuring cup (think 1-2 quarts!) in the microwave. Then, she would add salted Spanish peanuts and stir until everything was mixed and coated. Then, we would drop this mix onto waxed paper by the spoonful, and put the trays in the fridge. Rarely would I be able to wait until they were firm enough to handle.

I had nearly forgotten about this recipe until a year ago, when my mother gave me her oversized glass measuring bowl. She was a little reluctant, saying, "How am I going to make my chocolate clusters now?" But I reassured her: "I'll make them for you, Mom."And I did! But using the old childhood recipe, I found these candies too cloyingly sweet. And I had a variety of nuts and other fun ingredients in my cupboard that simply wouldn't be passed over.

So this recipe is my grown-up riff on a childhood favourite. I hope that perhaps, it can be the same springboard for you to make your own version of these candies.

Chocolate Clusters
These candies need to be kept in the fridge or they will become a big mass of messy chocolate. I prefer to eat these straight out of the fridge, while they are still cold. But, it's probably good - if you decide to be benevolent and share these with other people - to let them sit at room temperature for about 5 minutes. 

1 cup butterscotch chips
2 cups semi-sweet chocolate chips
Optional: 2 squares (2 oz.) of unsweetened baker's chocolate
3-4 cups of your favourite nuts and dried fruit

I like to use:
1 cup whole almonds
1 cup of peanuts, walnuts, or pecans
1/2 cup of pumpkin seeds
1/2 cup of shredded coconut (unsweetened)
1/2 cup of dried cranberries
1/2 cup of dried apricots, chopped or golden raisins

Melt the chocolate in a microwave safe bowl for 1 minute at a time, stirring until the chocolate is completely smooth with no lumps. Add in your fruits and nuts, and stir until coated. Drop by teaspoonful onto baking sheets lined with parchment, wax paper, or plastic wrap. Put trays in fridge or freezer until candies are firm. Store in an airtight container in the fridge for up to 3 weeks.

Makes a bunch, depending on how big you make them. This batch covered two large trays!

Homemade Hummus

Last weekend one branch of my husband's family had a little get together. We offered to bring snacks, so I made a plate of my homemade hummus and veggies. I make this hummus all the time at home, and it takes me less than ten minutes to make, so I was pleasantly surprised with rave reviews and requests for the recipe.

One batch of this hummus will supply nearly a week of healthy and delicious afternoon snacks or easy lunches. Spread on a rye cracker, topped with pumpkin seeds, this hummus makes a light lunch that still manages to sustain me until dinner. Crisp celery dipped in hummus is my favourite afternoon snack combination. Served with good olives, cheese and crackers, and a dry white wine, any hour instantly becomes Happy Hour!

I make this in my food processor, but you could easily adjust the order in which you add your ingredients to work with a blender, or even a immersion (or stick) blender in a big mixing bowl. Once you master the method, you can make all sorts of variations! Blend in some roasted red peppers drained of their oil; add 2-3 cloves of roasted garlic; or, add some pitted black olives and pulse just enough to combine.

Enjoy making your own hummus and knowing exactly what goes into it! Many storebought hummus brands include ingredients that make the hummus shelf stable, or make them last a long time. And if they are flavoured (like red pepper, for example), the flavour often doesn't taste nearly as fresh or rich as if you made it yourself. But the biggest problem with storebought hummus is the high levels of unnecessary sodium. When you make it yourself, you can add more lemon juice, vinegar, or garlic to bump up the flavour before you add extra salt.

Homemade Hummus
1 can (19 oz) of no-salt-added chickpeas, drained and rinsed well
1/4 cup of sesame tahini (you can find this near other Mediterranean foods)
1/4 cup of lemon juice (bottled is fine)
1/4 cup of olive oil (reserve some of this if you are using a food processor)
2 Tbsp apple cider vinegar (white vinegar is fine)
1/4 tsp garlic powder
1/2 tsp salt, or to taste

Optional (pick one):
3-4 pieces of roasted red pepper, drained of oil
2-3 cloves of roasted garlic, peeled
1/3 - 1/2 cup pitted black olives, drained

In a food processor or blender: 
Add all ingredients, but reserve some of the olive oil. Process all ingredients until smooth. While the motor is running, stream in the remaining olive oil. (This will emulsify the olive oil and make the hummus a bit lighter and fluffier.) Scrape down the sides of your food processor and taste the hummus for consistency and flavour. If it's too thick but the flavour is right, add a splash of water. If the flavour is flat, add a splash of lemon juice or vinegar. If the flavour is too sharp, add a splash of olive oil. If there are no "low notes" in the flavour, add another pinch of garlic powder.

Makes about 2 cups of hummus. 

Thursday, December 22, 2011

mulled wine for winter cheer

Recently, a dear friend came into town for a visit. We had put the date on our calendars over a month ago, but hadn't yet decided how we were going to spend our evening together. On the day of our long-anticipated date, we got on the phone and decided to go shopping for snacks and bevvies together. After conferring with each other, we decided on mulled wine, cranberry-cinnamon goat cheese, and chili chocolate.

Using the recipe in Joy of Cooking as a rough guide, we had delicious mulled wine that evening, just the two of us. But then, I decided to revamp the recipe for a party I was hosting. And, I scaled it up from two servings to 20.

The mulled wine (and the party) were a hit! I added some white grape juice, because I found the taste of straight simmered wine a bit too potent and slightly bitter for my taste. This is eminently drinkable, and very warming. I hope you enjoy lifting a cup of this with some loved ones this Christmas season.

Mulled Wine (with props to Mama Rombauer)

1.5 litres of dry red wine (ask your wine merchant for a recommendation - they'll direct you straight to a "value" red wine, which gets dressed up beautifully for the occasion)
1 litre of white grape juice
1/3 cup white granulated sugar
1/3 cup Cointreau orange liqueur
3 - 4 cinnamon sticks
1 orange, sliced into 1/2" thick slices, and studded with whole cloves

Pour all ingredients into a pot. Stir to mix until sugar is dissolved. Bring up just to a simmer, and then keep warm to serve. You can also prep and serve this in a crock pot if you have time.

Makes about 20 servings.

Thursday, December 1, 2011

Pumpkin Bread


In my last post,  I promised to share recipes I received via the recipe exchange I just sent out. Granted, this is NOT a recipe from a kind culinary stranger-cum-friend, but it was so fuss-less and easy I couldn't resist sharing it. In fact, it was so fuss-less to make that I started baking at 9 o'clock last night! 10 minutes later it was in the oven, and Jordan and I were curled up watching an old episode of The Sing-Off on PVR. The bread was baked before the show was over, and it smelled so delicious we had to try just one slice. Well, half a loaf later, and it had received Jordan's stamp of approval: after finishing his second slice, he flashed me a big grin and said nothing but "Mmm!"

This recipe has not changed since the 1970s, and once you taste it, you'll believe why. I am pretty sure that this recipe will quickly find its way into my memory, and will appear regularly whenever a surplus of pumpkin puree is lying around. The loaf is tender and moist, very fluffy, and the pecans add just the right amount of earthiness and crunch. It is nearly sweet enough to be considered cake, and makes an excellent accompaniment to a cup of tea or coffee. I halved the recipe, and still came out with two 8 inch loaves.

Enjoy!

Pumpkin Bread
adapted from The Wednesday Chef
who adapted it from the Monastery of Angels


Heat your oven to 350˚ F. Butter and flour two 8-inch loaf pans.

In a large bowl, whisk or sift together:
1 3/4 cups of all-purpose flour1 1/3 cups sugar1 teaspoon baking soda1 teaspoon ground cinnamon1/4 teaspoon ground nutmeg1/4 teaspoon ground cloves1/2 teaspoon salt
Set aside.

In another medium bowl, whisk together until well mixed:
2 large eggs1/2 cup vegetable oil1/3 cup water1 cup cooked and puréed pumpkin
Pour wet ingredients into dry ingredients and stir until just mixed. Add to the batter:
1/2 cup pecans, chopped if you like (I left mine whole)
and stir until incorporated.

Divide the batter evenly between the two prepared loaf pans, and bake for 50 minutes. Insert a toothpick into the center of the loaf. If it comes out clean, the loaf is done. Let rest for 5 minutes before removing from loaf pans, and set on a wire rack to cool. Use a sharp knife to cut the loaf, because it can crumble easily.

Saturday, November 19, 2011

recipe exchanges

I love recipe exchanges. You never know where the recipes are going to come from - they're always vastly different from my own cooking style, and provide great inspiration for the kitchen. I received the initial email from my friend Rebecca, and this was the recipe I thought to send off. I posted it a couple years ago, but it's such a good standby soup that I thought I'd repost it for your enjoyment and delight. And, as the recipes come in from the exchange (I'm supposed to get 36!), I'll see about posting some of those here to share with you as well. Enjoy! 


Leeky Dill Italian Sausage Soup

1 package (about 5 large sausages) of hot italian sausage, removed from casings
2-3 medium leeks, cleaned and diced (white and light green parts only)
2 large russet potatoes (scrubbed and peeled)
1 large can diced tomatoes
water or vegetable broth
1 bunch of fresh dill (fresh is best!)
salt and pepper

In a large cast-iron skillet, sauté the sausage meat until browned and cooked through. Break up any large chunks of meat. Drain off the fat, reserving it in a bowl to use for caramelizing the leeks. Move the sausage to a large stock pot. In the skillet again, use about a tablespoon of the sausage fat to caramelize the leeks. They should be just browned on the edges and still a vibrant green. Put that into the stock pot with the sausage. Add the potatoes, roughly chopped, to the stockpot, along with the can of diced tomatoes. Add enough water or vegetable broth to cover all the ingredients, and bring it to a boil. (At this point you could even warm the water/veggie broth in the skillet, and scrape up any caramelized goodness and pour that into your stockpot as well.) Simmer until the potatoes are tender.

10 minutes before serving, remove any stalks from the fresh dill and roughly chop it, so there are no large "bunches" of dill, just small sprigs. Stir that into the soup and let the dill flavor become vibrant. Season to taste. Serve with a dollop of sour cream and lots of crusty bread. 

Tuesday, April 26, 2011

Spring Colors at Home


This year, the 40 days of Lent seemed to drag on for me. I had more on my plate than ever before, and at times it felt as if I didn't even have time for the things that bring me life and sustenance.  Cooking, tending my home, spending time with close friends over copious cups of tea, and getting outdoors - all these things got waylaid in favor of long workdays and nights watching some of my favorite TV shows on the PVR. 

I admit, it wasn't the best way to spend my evenings. But, I tell you, it's what I could handle in the midst of rehearsals, planning, concerts, more planning, meetings, more rehearsals, and finally, Easter services. 

So when I woke up yesterday morning, the Monday after Easter, I had high hopes for my day off. My houseplants were in desperate need of some TLC, so I was going to trim and repot the overgrown ones, nurturing new little shoots into full grown plants. My bathroom and kitchen floors needed scrubbing, my recital rep needed rehearsing, my friends needed phone calls and tea dates, my bookshelves needed organizing, and my laundry needed laundering. 

What I didn't realize was that I, personally, was leaping from the drudgery of my Lenten season right into the celebration of Easter resurrection without first allowing myself to stop, to rest, between the cross and the empty grave. 


Holy Saturday gets little "airtime" in the church year. Some churches host Holy Saturday vigils, but these can be elaborate affairs that tire out church workers rather than still and quiet the soul. Because here's the thing: on Holy Saturday, all we can do is wait.


On Good Friday, the day Jesus was crucified, there was a flurry of activity. Crowds milled around to gawk at the spectacle.  There were people wailing in grief and anger. The soldiers tried to hurry on the gruesome process of death. But for Jesus, there was no need for that. He had already slipped into death. I imagine there was a brief moment of dumbfounded confusion when the soldiers realized he was dead. Then they might have shrugged their shoulders, and moved on.  But Jesus' death spurred on even more activity. A man named Joseph made arrangements for Jesus to be buried right away, before the sabbath began that very evening. Nicodemus brought what seemed to me an obscene amount of spices - 75 pounds of it! - to wrap up Jesus' body. Perhaps in his grief, he was a big spender. Perhaps, being a man during a time when burial rites may have primarily been the work of women, he just didn't know how much to buy. But, they were quick and efficient, and Jesus was buried before the sabbath began. 

In the gospel of Mark, the story skips directly from Jesus' burial the night before the sabbath to the morning after the sabbath. Mary Magdalene and Mary, Jesus' mother, watch as Jesus' body is laid in the tomb. The very next verse begins, "When the Sabbath was past..." (Mark 16:1). The flurry of activity begins yet again as three terrified, grief stricken, trembling women make their way back to the tomb to anoint Jesus' body. You know what happens next. Instead of finding Jesus, they find a young man in brilliant clothes who tells them, absurdly, not to be alarmed that there is nothing in the open tomb except the cloth Jesus was wrapped in. The gospel of Mark ends with the women running away, and the other gospels describe even more astonishing events as the disciples wonder at and realize what has happened. 

But what about that Sabbath day, the single, holy day embedded between grief and surprise? 


It is a day to wait.

For Mary Magdalene and Mary, Jesus' mother, their waiting was motivated by the rhythm of resting and abstaining from all forms of work on the Sabbath day. It must have been an impatient waiting, which apparently could not end soon enough - "very early on the first day of the week, when the sun had risen, they went to the tomb." They did not anticipate the surprise they would receive there. They went seeking to embody their last expression of love and care for a man who had changed their lives, but found that even death could not keep the Lord of life.

We also are tempted to wait impatiently, to hurry through a day that cannot end soon enough, so that we can celebrate the victory of Easter morning. And - too often! - we hurry through the sure and measured steps of the season of Lent, sometimes skipping the grief and pain of Good Friday entirely. But the thing is, no matter how much - or how early! - we celebrate Easter, with trumpets and Easter lilies, chocolates and roast chicken, the only one capable of bringing about Jesus' resurrection life in us is the Lord of life himself. And He tends to do it in his own sweet timing.

But Holy Saturday, from a post-Easter perspective, teaches us to wait for God to bring about his resurrected life in us.

For me, as for many church workers around this time of year, getting through Easter season was a challenge. It requires stamina, hard work, lots of planning and attention to detail. (And a little bit of time for spiritual reflection, if you can manage it.) For me, the workload of Lent and Easter is not unlike a kind of death. It requires a sacrificial pouring out of my time and energy, in slow, measured steps. Likewise, the days after Easter promise a new sense of freedom, with more time and less work to fill it, allowing me to once again embrace those things that bring me life and joy - cooking, tending my home, spending time with close friends over copious cups of tea, and getting outdoors.

But even I had forgotten the patient waiting that needed to happen before that new life could spring up again. On Monday, I found that every attempt I made to return to "normal" life and activities was thwarted by my own exhaustion. On top of that, I found myself getting frustrated with my inability to embrace the new sense of freedom my newly lightened workload offered me. What I needed was the waiting of Holy Saturday.  I needed the stillness, and the quiet that can only be found between the effort and pain of Good Friday, and the glorious, surprising victory of Easter Sunday.

So my own Easter story goes like this: It was not until this morning that I had the desire or the joy to attempt decorating my apartment. But once I started, it was delightful. I replaced dark and tired winter decorations with fresh spring blooms and bright colors. Plants that were crowded in their pots now have room to grow and sprout.  Even a set of tulip bulbs that were stored away in the laundry room had audaciously and optimistically sprouted without my noticing! Now they are potted up and watered and awaiting the spring sunshine to coax out their blooms (in the purple pot below - they look a little like albino rhino horns).


But the best part of my own Easter story is this: The season of Easter lasts 7 weeks! Easter Sunday is only the beginning of new life. After all, it takes a full month for the little tulip buds to blossom after they've poked out of the ground. This blossoming of resurrection life is worth the wait.

Saturday, September 11, 2010

Plate of Love Part 2: Raspberry Yogurt Cake


As promised... (ahem, nevermind that I promised this months ago) the cake I love to make, using Clotilde's recipe for Gâteau au Yaourt which she makes with raspberries. Of course I've made my own adjustments, since the genius of this French staple is that you buy a tub of yogurt, and then use that as your measuring cup for all the other ingredients. Children love to make it. I've adjusted it to my North American measuring cups and baking habits. But it is essentially the same kind of cake: fragrant, moist, fluffy, and it has raspberries! Which are quite possibly the best fruit in the world. 

I made it in June, with raspberries, and I made it today. 

But today, I fiddled with it. I wanted to save some raspberries, my stash being very-plundered and not-yet-replenished, but I also wanted to make room in my freezer for the glut of blackberries I hope to pick in the next few weeks. And I had no yogurt! 

What's a girl to do? 

Marionberry Buttermilk Cake. Naturally

I know, you're shaking your heads at me ("Can't that girl leave well enough alone?"), but I can't help it! Who wants their cake to be the same every time? And I love taking the risk - although it's a very slight risk - of trying something new and seeing if it turns out as well as I hope it will. 

Judging by the fragrance coming from my kitchen right now, I think it has turned out. I'm taking it to a BBQ tonight, and my friends know well enough by now that I only experiment on people I love. 

So today, instead of just one recipe for Clotilde's Raspberry Yogurt Cake, you're getting two. 

Raspberry Yogurt Cake (à la Clotilde)

Preheat your oven to 350˚ Fahrenheit. 

Butter and flour an 8 or 9 inch tart, cake, or pie pan. Set aside. 

In a medium bowl, whisk together: 
1 cup plain yogurt
1 cup brown sugar
1/4 cup oil 
3 eggs
1/4 tsp vanilla extract

In another small bowl, whisk together: 
1 1/2 cups all-purpose flour
1/4 - 1/2 cup ground almonds (you can do this in your food processor or blender)
1 Tbsp baking podwer
1/2 tsp salt

Gently stir together both wet and dry ingredients, until full incorporated. Do not overmix. 

Pour half your batter into your prepared pan, and use a rubber spatula to smooth the batter to the edges of the pan. Cover the batter with 3-4 handfuls of fresh or frozen raspberries (or 1-2 cups, if you must measure), then pour the rest of the batter over, once again smoothing it with a spatula. 

Sprinkle a coarse-grained sugar (such as raw cane sugar or demerera sugar) over the top of the batter. 

Bake at 350˚ for 45-50 minutes, until the top of the cake is golden brown, the cake is puffed and slightly cracked, and doesn't wiggle when you shake it. (Trust me, this test does work!) Clotilde suggests that if the top is browning too quickly, then tent it with foil to finish baking. 

Let cool. Serve room temperature, with lightly sweetened, floppy whipped cream. 

Marionberry Buttermilk Cake

Substitute buttermilk for yogurt. 
Substitute marionberries for raspberries. 

Proceed as with the other cake. 

Wednesday, September 8, 2010

B3 Muffins

This weekend Jordan and I went down to Washington to visit my mom. Before we left, we had a pile of bananas threatening to go completely brown and soft on us, so I did what was only right to save the bananas from their imminent mushy death and our apartment from a new infestation of fruitflies: I baked muffins!

I have made these muffins, in some incarnation, at least a couple times a month for the last year. They're hearty yet light, fragrant, fruity with bananas and blueberries. And, I have the distinct pleasure of knowing how nutritious and delicious they are. They keep well in the fridge for up to a week, but I bet they won't last that long.

I like making them in a couple of sizes. I have a mini-loaf pan, which I bought under the influence of the Morning Glory muffins at the Mix Bakery down our street. These mini-loaves are big enough for a hearty breakfast. And, I also make a "snack size" muffin, either in a regular muffin tin, or a tartlette pan, which is what I used this time.

A number of people have asked for the recipe for these muffins, including my mother. So, Mom. This is for you.

Tora's B3 Muffins (Banana, Blueberry, Buttermilk)
The trick with these muffins is to customize them to your taste and your pantry. I use the ratios of dry-to-wet ingredients as my baseline. Use what you have! If you don't have bananas, use applesauce and make a little cinnamon strudel topping. If you don't have buttermilk, use yogurt. Is it near Thanksgiving? Use cranberries and pureed pumpkin instead of blueberries and bananas. You could substitute any other grain for the flaxseed or soy flour... spelt, quinoa, or amaranth flours would all be lovely here. Your imagination is the limit!


Preheat your oven to 350 degrees Fahrenheit.

In a large bowl, stir together your dry ingredients:
2 cups all-purpose flour
1/2 cup whole wheat flour
1/2 cup rolled oats
1/2 cup wheat germ or wheat bran (optional... or just use oats instead)
1/3 cup brown sugar
1/4 cup flaxseed meal (optional... I use Bob's Red Mill)
3 Tbsp soy flour (also optional... I use Bob's Red Mill)
3 tsp baking powder
1 tsp baking soda
1/2 tsp salt
dash of ground nutmeg, cinnamon, and cloves (to taste)
1/2 cup - 1 cup of chopped nuts (optional too... and I like walnuts)


Stir together with a whisk until thoroughly incorporated. (I like to use my hands.) Set aside.


In a separate medium bowl, mix together your wet ingredients:
1 large or 2 small-to-medium ripe bananas, peeled and mashed with a fork (I leave them a little chunky)
1 cup buttermilk or yogurt (if you use sweetened yogurt, decrease the amount of sugar used above)
2 eggs
3 Tbsp oil or melted and cooled butter
3 Tbsp molasses (optional)
1 tsp vanilla


Whisk together until smooth, but do not over-beat! Set aside.

Line your muffin tins with paper liners OR grease them well with butter.

Pour the wet ingredients into your dry ingredients and stir until just incorporated. Add 1-2 cups fresh or frozen blueberries to the batter, and fold in. DO NOT OVERMIX or your muffins will get tough, chewy, and lose that lovely tenderness of crumb.

Spoon the batter into your pans, and bake for 20-25 minutes, depending on the size of your muffin pans, until the tops are golden brown. (I bake mini-loaves for 25 minutes or more, and the smaller muffins for only 20.)

Set the pan on a cooling rack and let cool for 5-10 minutes before removing muffins from pans.

Serve warm with butter.

Saturday, July 24, 2010

Summer beauty


Summer has arrived in earnest around here. We've been berry picking three times now. We have survived the first heat wave, when every day tempts you to the beach to float in the cool ocean water. And the early, succulent spring flowers have given way to feathery, wiry, gaudy summer flowers that bob and nod in the sweltering afternoons and the blissfully cool evenings.


Construction and garden maintenance are also in full swing. One day, a chainsaw buzzed all day just outside our living room windows. The next day, a jackhammer... well, hammered all day across the street. The next day, we heard the incessant thump, thump, plonk! of a basketball in the alley, followed by distressed or celebratory "oohhh!"s from the dozen 18 year olds who are subletting the big house next door. And the next? A weedblower. Right under the bedroom window. Really, is using a broom or a rake so difficult?


Despite that, we've had family visiting, and have enjoyed showing off our beautiful city in the summertime. Jordan's brother, and then parents, have come out to visit us. We took them to the glistening Shannon Falls, hiked the Chief, and took the gondola to the top of Whistler and Blackcomb mountains. Oh yes, and went blueberry picking. Jordan's dad, a Manitoban farmboy at heart, especially loved blueberry picking. But who's kidding who? We loved it too.


And we've been grilling, cooking, eating well. Blueberry tarts with a sweet-crunchy shortbread crust, spiked with lemon zest and topped with floppy, just-sweet whipped cream. Ice cream with brandied-rhubarb compote. Barbequed pork chops with last summer's applesauce. Perfectly-roasted rosemary-scented potatoes.

Yes, summer has been good to us so far. Un vraiment bon été.

Has it been so for you?

Thursday, July 1, 2010

You Can Make That!? Strawberry Freezer Jam and Nutella


To me, summer means picking berries. I relish the days that find me driving out of the city, into the ag-belt surrounding Vancouver, and spending the morning on my knees among berry bushes and vines, picking hundreds and hundreds of fresh ripe berries. Out on the farms, there are always young children exclaiming to their parents over their latest, biggest, juiciest find. There are always newly-retired couples coming out to buy their flats of berries. And there's me, dropping one berry in the bucket, popping one berry in my mouth, dreaming of berry crisps, smoothies, and jam.

Right now, it's strawberry season in Vancouver. Jordan and I went out to Westham Island on Saturday. And in a matter of what seemed like minutes, we came away with pink-stained fingers and mouths and five big buckets of beautiful strawberries.

The next evening, we put up more than 20 jars of freezer jam.


This jam will last a year of breakfasts: poached eggs on toasty english muffins, with strong coffee and fresh orange juice.

Making freezer jam is surprisingly simple. Here's what you do:
* pick strawberries at a local farm
* buy packages of Certo pectin
* follow Certo instructions for making "No Cook" strawberry jam

Basically, you mash the cleaned berries in a big bowl. Stir in an obscene amount of sugar and let it sit for 10 minutes while you boil the pectin powder in some water. Pour the pectin into the berries. Ladle the jam into clean jars with tight-fitting lids, and let sit overnight. Store in your freezer until you're ready to crack open that first jar of jam. Presto!

Speaking of things that you spread on toast... This morning I am also making our own version of nutella. Most people love the smooth, nutty-chocolate-y concoction. But, if you're into reading the labels of your packaged food, Nutella will shock and stun you. It is filled with partially-hydrogenated junk, which is of course what makes it silky and delicious. I first found a recipe on I Made That! and have since been making it at home. It is also surprisingly simple, and requires an oven and a food processor. (Which, by the way, is the best kitchen appliance ever, second only to my KitchenAid stand mixer.) And if you are anything like my German friends who expect Nutella to taste more chocolate-y than the North American version they've found here, by making your own you can adjust the balance of flavors to your own taste.


I hope you enjoy making your own toast-toppings as much as Jordan and I do. Our refrigerator is jam-packed (oh Tora, haha) with homemade almond butter, jam, and nutella. And it makes our breakfasts that much tastier.

Homemade Nutella

2 cups hazelnuts
7 Tbsp cocoa powder
1 cup powdered sugar
1/4 tsp salt
1 tsp vanilla extract
1/4 canola oil

Roast the hazelnuts at 375 degrees Fahrenheit for 10 minutes. Let cool. When cool, roll the hazelnuts in a dishtowel to remove the brown skins (which can give the hazelnuts a bitter taste).

Process the hazelnuts in the food processor until it is a smooth butter. This will take about 5 minutes. Scrape down the sides a couple of times while you're doing this.

Add the cocoa, sugar, salt, and vanilla to the processor bowl. Process 15 seconds, until just incorporated. While the processor is running, pour the canola oil in a thin stream. Puree until you get the consistency you want.

Taste the nutella for balance of flavors and texture. Spoon it into jars and keep in the fridge. Bring to room temperature before using.

Makes 2 cups.

Thursday, June 24, 2010

Plate of Love Part 1: Spicy Maple-Glazed Pecans


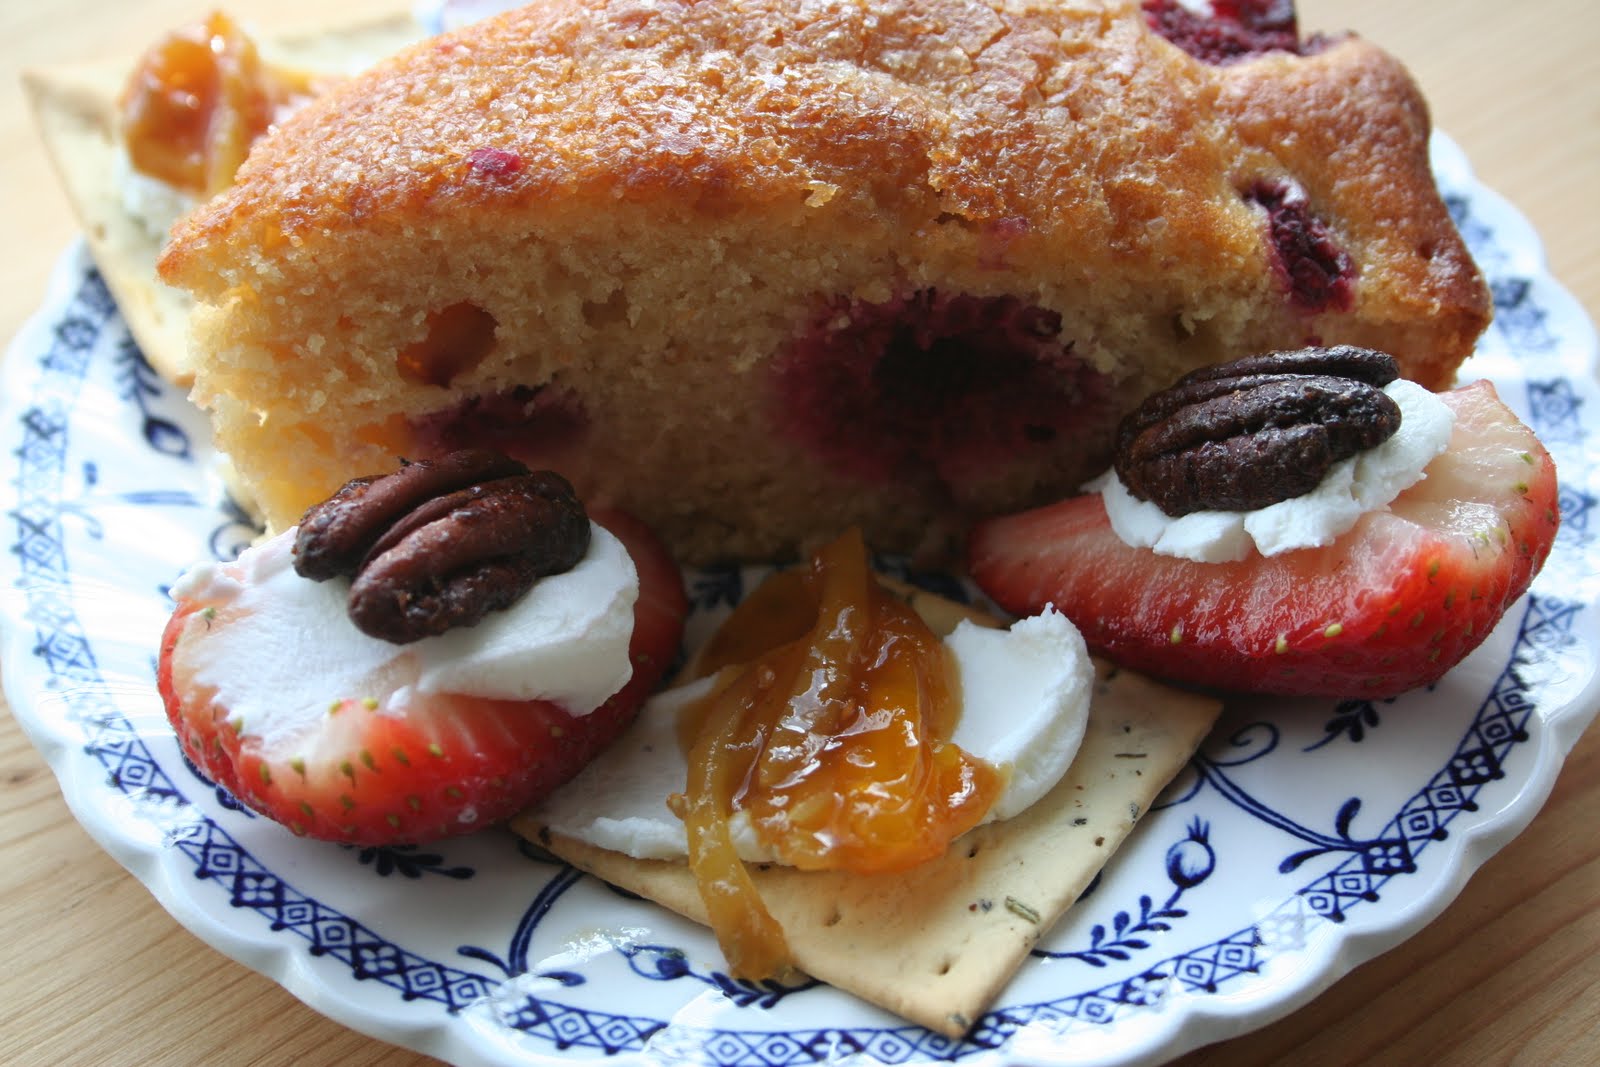
I made this as a snack for Jordan the other day.

I was jealous.

The cake is a Raspberry Yogurt Cake, inspired by Clotilde at Chocolate & Zucchini, has become one of my favorite summer afternoon tea-cakes. It is light, buttery, spotted with fresh, juicy raspberries, and topped with crunchy, caramelized coarse-grained demerera sugar. Because of the moisture and richness provided by the yogurt added to this cake, it requires a lot less butter than most cakes. And, if you use sweetened yogurt you can drop the sugar level down quite a bit, too.

The crackers are simple rosemary-garlic snack crackers, with a mild enough flavor to support toppings. They are topped with soft goat cheese and last summer's savory-jam-experiment, my Golden Cherry Tomato and Ginger jam.

The strawberries... oh! the strawberries! They were the first organic strawberries to arrive in the market this season, and they are sliced in half and stuffed with the same soft goat cheese. But the crowning piece to this amuse-bouche are the Spicy Maple-Glazed Pecans.

I must have had a particularly inspired afternoon, because these turned out amazingly (and surprisingly!) well in the first attempt. They are sweet, spicy, crunchy, buttery, with layers and layers of flavors that may make you ask... "Is that balsamic vinegar I taste?" I first made the pecans to provide some crunch to a spinach salad that included strawberries, that lovely goat cheese, and a herby vinaigrette. However, as soon as they came out of the oven, Jordan and I started snacking on them, and frankly... we couldn't stop! I trust you won't be able to either. Wasn't it that Pringles ad that challenged, I dare you to eat just one?

This is the recipe you're getting today. I will post my recipes for the tomato-ginger jam and the cake soon.

Spicy Maple-Glazed Pecans

Line a large, rimmed baking sheet with parchment paper. Brush the parchment paper with melted butter. (Trust me on this one.) Preheat your oven to 500 degrees Fahrenheit... basically you will be broiling these.

In a bowl, mix together until smooth:
1/2 cup brown sugar
1 tsp ground cinnamon
1/2 tsp ground cloves
1/4 tsp cayenne pepper
1/2 tsp salt
1/2 tsp black pepper
1/4 cup maple syrup
2 Tbsp balsamic vinegar

Fold in, tossing gently so as not to break the halves into smaller pieces:
2 - 2 1/2 cups pecan halves

Broil for four minutes. Stir or turn over the pecan pieces carefully; they will be very hot and bubbly! Broil for one more minute on the other side.

Let the pan cool completely before serving. They will get crunchier as they cool.

Saturday, June 19, 2010

Maple Bacon Brussel Sprouts


I am in love with brussel sprouts.

I have never liked them before. In my childhood opinion, they were always noxious little versions of cabbage, which I definitely didn't like. And they always showed up dressed in faded army-green, smelling even worse than they looked. There was no way those brussel sprouts were going to get asked on a date. I didn't realize how poorly they had been treated.

And then I tried these. Steamed until just tender, tossed with crispy bacon pieces, gently caramelized, and then lightly dressed in pure, buttery maple syrup, these brussel sprouts are ready for a night on the town. Worthy of any black tie occasion. Or good enough to eat every day, for that matter.

Yes, a real love affair. Don't tell my husband.

Maple Bacon Brussel Sprouts
These brussel sprouts are best on the first day. If you have leftovers, they may come out dressed in that faded army-green color again, but they'll be just as tasty. The trick is not to overcook them so they keep a bit of bite and their vibrant green color.

Look for sprouts that are in season (late winter and early spring), with tight heads and unblemished leaves. It's even better if you can find them still on the stalk.

4 slices of good-quality bacon
2 lbs. brussel sprouts
3 Tbsp. butter
salt & pepper
water
3 Tbsp. good-quality maple syrup

Slice the bacon into small strips. Fry them on medium high heat in a frying pan until crisp and golden brown, draining and reserving the fat. Set the bacon pieces aside.

Wash and cut each brussel sprout in half. In the same pan you used for the bacon, melt the butter. Place the sprouts cut side down in the pan, taking care not to crowd them together; you want a single layer of sprouts. Season with salt and pepper, and add enough water to cover the bottom of the pan. Cover with a tight fitting lid, and simmer on medium high heat for 15 minutes, or until the water has evaporated and the sprouts are beginning to brown on the bottoms. Toss a couple times at this point and let the sprouts get some color on their rounded sides.

Test one with a fork to make sure it's tender. Add back the bacon pieces, and drizzle the maple syrup over. Toss it all together, and serve warm!

Should serve about 4 people as a side dish... or 2 people, if you're me and my husband.

Sunday, June 6, 2010

a "profound" Carrot Cake Hybrid


Yesterday afternoon we attended a garden party. The sun was shining, there was a light breeze, and we could hear the rides at the PNE as they motored uphill and the screams of gleeful riders as they hurtled, whirled, and dove.

It was Susan's birthday. And she had requested carrot cake with cream cheese frosting, please!

I had made a carrot cake for Jordan's birthday a number of weeks ago, and was pleased with how it turned out. However, as with most recipes, I love tinkering the second time around. I also tend to experiment on people I love, and this was for a dear friend. As usual, I wanted to turn down the sugar and turn up the flavor. Using Joy of Cooking as my basic guide, and More With Less for some inspiration, I came up with a Carrot-Applesauce-Nut Cake hybrid that was incredibly delicious. It was quite crumbly in the center, and didn't hold up terribly well to slicing. However, the tenderness of the crumb, the layered flavors, and the tangy-lemony cream cheese icing elicited "mmm"s from everyone. Kirsten said, "Tora, this is a profound cake."

Profound, indeed. The batter is light and bright, unlike many carrot cake batters that I've encountered, which are dark, oily, and taste syrupy-sweet. Adding extra baking powder and soda gives the cake loft. The applesauce combined with the spices gave the cake a lovely gingerbread-fruity undertones. And the lemon! I simply cannot have cream cheese frosting without lemon zest, forevermore. I trust that once you taste it, you won't go back, either.

Profound Carrot Cake
This recipe makes two 8-inch layers. I think it would also work well in bars, so you could easily pour the batter into one 9 by 13 inch pan. It is also extremely handy if you have an electric mixer and/or beaters to make the batter, and a food processor for the frosting.

Line your pans with parchment paper, or butter and flour them copiously, and especially in the corners. I traced the bottom of my pans onto parchment paper, and Jordan cut them out for me. I put these circles on the bottom of the pans, and buttered the flat sides of the pan. This worked beautifully! The cakes came out easily, and because I kept the paper on the bottom of each cake, they stacked well for transporting.

Preheat your oven to 350 degrees Fahrenheit.

Whisk together in a bowl and set aside:
2 cups all-purpose flour
1 1/2 tsp baking soda
1 tsp baking powder
1 tsp ground cinnamon
1/2 tsp ground cloves
1/2 tsp ground or grated nutmeg
1/2 tsp ground allspice
1/2 tsp fine grain sea salt

Shred and set aside:
2 cups shredded carrots (this will take about 2 large carrots, peeled)

In the bowl of your stand mixer (if you have one), cream together:
3/4 cup butter, softened
1 cup brown sugar, packed

Add to the creamed mixture, and beat until just combined:
3 eggs
1 cup applesauce

Add the dry ingredients to this wet mixture, and beat on low speed until just combined.

Then, add in, stirring again until just combined:
your previously shredded carrots
1 cup chopped walnuts
1 cup golden raisins

Pour the batter into your cake pan(s). Bake for 25 minutes, until the center of each cake is set (not batter-y), and the top is golden brown. Let cool for five minutes in the pan, then turn out the cakes and let them cool completely on racks. (If you're using a 9 by 13 pan, let the cake cool in the pan. Once it's completely cool, then you can frost it in the pan and cut into bars.)

When your cake is cool, and you are just about ready to frost the cakes, make the frosting.
Pulse in your food processor until smooth:
8 ounces of COLD cream cheese
Add and process until combined:
2 tsp vanilla
Add, and process until combined:
3 cups powdered sugar

Pour your frosting into a separate bowl, and STIR in:
the zest of two lemons

Frost your cake, and devour!

Friday, March 19, 2010

You Can Make That!? Hot Cocoa Mix

Welcome to the second installment of my new little series called You Can Make That!? As I explained in my last post on how to make your own nut butter, this series demystifies commonly purchased food stuffs which many of us assume can only be bought in a package. It is my hope that you can make many of your favorite food staples at home, for much cheaper than storebought, and in much better quality! (i.e. without all the gunky, overly-refined, faux-food additions that usually end up in our bellies)

Jordan and I started making our own cocoa mix after we'd gone through a huge tub of hot cocoa mix my mom had bought for us. She knew how much Jordan loved cocoa, and in her thoughtfulness and love for us, she bought a Costco tub of Carnation cocoa. It was too sweet for my taste, dark chocolate lover that I am, but Jordan loved it and drank a cup of cocoa nearly every other night. One night, however, we turned the tub over in curiosity, to look at the ingredients. Reading that list was almost enough to make Jordan stop drinking cocoa entirely. So I figured out how to make our own.

We discovered that hot cocoa mixes use poor-quality chocolate, which has often been burned in the processing... process (!). So, more sugar than necessary is put in to compensate for the potentially bitter taste of said burnt chocolate. And, because it's assumed that hot cocoa mixes will be mixed into hot water, lots of weird hydrogenated things are added to make the cocoa taste more creamy.

Here is our little recipe for hot cocoa mix that we've come to love. I recently served a cup to a friend and he said, "Tora, that was the best cocoa I've ever had." He didn't know it was homemade mix. But yes, it is that good.

Hot Cocoa Mix

equipment:
one glass jar with tight fitting lid

(really. that's all you need.)

In your jar, mix equal parts of the following three ingredients:
* unsweetened cocoa powder (Fry's, Nestle, whatever)
* sugar (white granulated)
* dry milk powder (you can buy it in the baking supplies section)

Add a dash of any of the following to suit your taste:
* salt
* ground cinnamon
* cayenne pepper
* instant OR finely ground espresso powder

Shake it up! Tightly screw on the lid and store in your cupboard, which hopefully is dry and cool.

When you're ready to make a cup of cocoa, do what Jordan and I do. Or don't. Come up with your own way to do it. (That is, after all, what this series is all about. Doing it your own way.)

We fill our cocoa mugs with milk, and microwave them for a few minutes, until the milk is steamy. I scoop in a few (2-3, depending on the size of the mug and how strong you like your cocoa) heaping tablespoons of cocoa mix, and stir. Make sure to rub out any clumps of cocoa against the side of your mug with the back of the spoon. Unless you like clumpy cocoa. Jordan usually adds a little extra dash of sugar, which makes me cringe. Add marshmallows, preferably homemade ones... or ones from Butter Bakery on Dunbar Street. (Yes, you can make those too! But that's for another post.)

Saturday, March 13, 2010

You Can Make That!? Nut Butter

Welcome to the first post of a new series on my blog, inspired by my husband. We're calling it "You Can Make That!?" Here's why. There are many common food items we take for granted as un-makeable, only buy-able. Cream of mushroom soup comes in a can. Alfredo sauce comes in a jar. Peanut butter, bread, nutella, jam, granola, applesauce, hot cocoa, mac-n-cheese, pizza, spaghetti sauce... the list goes on and on! And we* assume, that since these things have always** come in packages, that they will forever after only be acquired by purchasing these packages.

However, we have been slowly discovering more things that we can make for ourselves. And the benefits are incredible, particularly in quality and cost. Jordan likes bragging about all our homemade food. Which always elicits the response, "You can make that?"

Yes. Yes you can.

Today I'm spilling the beans on our homemade peanut butter. Nut butter is one of the first things I started making at home. We tried a few versions until we landed on a blend of almonds and peanuts that we really love. You can use any kind of nut you like, depending on what texture of nut butter you prefer. If you like something smooth, creamy, and light, you'll could use peanuts, cashews, or walnuts. Of course, peanuts and cashews have a lot of fat in them. Almonds and hazelnuts will be lower in fat, but will produce a denser butter.

This is more of a method than a recipe. Once you've made one nut butter, you'll have mastered the basic concept so you can branch out from there. Tweak and play with the ratios of nuts until you find one that you really like.

* "We" refers to our generation... the 20-40 somethings who have grown up with the glories of packaged food.
** Well... as long as "we" can remember! But, we forget that anything that now comes in a package once came through a little ingenuity and a little work in the home kitchen.

Homemade Nut Butter

Equipment:
rimmed baking sheet
oven
food processor

Ingredients:
3 cups whole, raw nuts (we use 2 cups almonds and 1 cup peanuts)
a dash each of salt and sugar (about 1 tsp, if you're a measuring sort of person)

Preheat your oven to 375 degrees Fahrenheit.

Pour the nuts onto the rimmed baking sheet, making sure they're spread out in a single layer. Toast them in your hot oven for 10 minutes, keeping a close eye on them. Don't let them burn! Stir them or turn them over with a pancake flipper once.

Let them cool completely.

Pour the nuts into your food processor. (you'll need a food processor bowl with at least 4 cup capacity.) Plug your ears. This part gets loud. Process the nuts for about 10 minutes, until they turn from nuts into powder into paste into your desired consistency. Scrape down the sides of the food processor bowl a few times, so you get an even consistency. At around minute 5, the nuts will begin to release their naturally occurring oils, and the butter will get more and more pliable. The butter might also begin to get warm and steam up the processor bowl. Don't worry... nothing's wrong.

Taste the butter, and add salt and sugar to taste. (I find that the combination of toasted nuts and savory-sweet works really well together.)

Pour your butter into a jar with a tight-fitting lid. I use a 2-pint mason jar with a wide mouth. We keep the butter in the fridge, and it never sticks around long enough to go bad. But, you could probably keep it up to a couple months.

Because you're not adding any oil to the butter, you won't have much trouble with separation. If you find your butter separates at all, just stir it back in.

Monday, November 2, 2009

Garlicky Kale and Black Bean Soup

I love it when the two thoughts of "I should clean out my fridge" and "What's for dinner?" converge to inspire me to create something tasty and delicious. Last night was the perfect example. I knew already that I was going to make mac 'n cheese, Klassen-style, for my dear husband: macaroni baked in a thick, creamy cheese sauce topped with cornflakes, thick slices of bacon, and baked until the bacon is crisp and the cornflakes and macaroni have soaked up the fatty goodness. But my heart started palpitating at the mere thought of eating that, and only that, for dinner.

So I rummaged through the fridge, looking for anything with more nutritional punch than mac 'n cheese. I found some cooked black beans leftover from bringing soup to a friend's house. I also found one lonely potato. Thankfully, I had recently bought a bunch of kale, thinking, "I need vitamins. And kale is tasty vitamins." Add sauteed onions, garlic, and broth, and we had dinner.

The soup was hearty yet brothy, filled with color from the kale, black beans, and potato. We topped it with lots of freshly grated parmesan cheese. You could definitely add homemade garlicky croutons to increase the interest and crunch-factor of this soup. And, this soup can be a good winter-time staple, since kale is a hardy winter green, and potatoes, beans, onions, and garlic are all easy to have on hand. Kale is also a really easy green to grow, so if you have some in your garden, use it up! Enjoy!

Garlicky Kale and Black Bean Soup

1 onion, roughly chopped
2-3 Tbsp olive oil
1 1/2 cups cooked black beans
1 medium potato, roughly chopped
4 - 6 cloves garlic, peeled and roughly diced
1 bunch kale, stems removed and sliced into ribbons
about 4 cups vegetable broth (using bouillion is fine)
salt and pepper to taste
parmesan cheese, grated

In a heavy-bottomed pot, heat the olive oil and add the onions. Saute on medium-high heat until the onions are soft and translucent. Add the potato pieces and the black beans, a little water (to cover the bottom of the pan) and the chopped garlic. Stir, cover, and let cook for about 10 minutes. When the potato is tender, add the vegetable broth and bring to a boil. Lower the heat, simmer for a few more minutes, and adjust your seasonings to taste (add salt, another bouillion cube, etc.).

While the soup is simmering, thoroughly wash your kale, especially if it's curly. Dirt and little bugs can get caught and stay hidden in its leafy folds. De-stem* each leaf (the main rib of each kale leaf is really tough and probably not tasty, although I've never tried eating one). Chop the kale into thin ribbons.**

About 4 minutes before you're ready to serve, plunge the kale into the hot soup. It will begin to wilt and turn bright green, and stay bright green for about... 10 minutes.*** Serve it immediately, while the kale is still pretty. Top each bowl with a healthy pile of grated parmesan cheese. Slurp and enjoy.

Makes about 6 servings.

*To de-stem your kale, lay each leaf down on your cutting board. Using a small paring knife, run the tip of the knife along the stem, taking the leafy parts off both sides of the tough stem.
**To do this, pile your de-stemmed leaves on top of one another, and try to cut along the longest part of the kale leaf. Chopping kale into ribbons ensures that it doesn't turn to green confetti, but maintains some shape and structure in the pot.
***Kale tends to turn a dingy brownish-green when it's overcooked... or when it's sat too long. It doesn't affect the taste at all, but it does lose some of its vibrant, colorful green. Serving your soup immediately after you throw the kale makes it more visually palatable.

Tuesday, September 1, 2009

Rooftop Farms: Brooklyn, New York


Rooftop Farms in Brooklyn, New York, has transformed the roof of this old warehouse into a thriving urban farm. The farm supplies organic food to local restaurants and cafes, as well as providing protection for the roof its built upon.

The creation of urban farms can (and I believe will) slowly transform a barren urban landscape into a place where slow food and neighborhood connections can thrive. Read one Brooklyn-ite's experience of Rooftop Farms. He and his wife went for a Sunday afternoon visit, and came home with produce for the week. They walked there, and walked home. How many of us, living in cities where it's easy to pass a day without anyone recognizing you or knowing your name, would benefit from this kind of neighborhood interaction?

Monday, August 31, 2009

Bobby McFerrin and the Wizard of Oz


In this video, Bobby McFerrin proves his incredible mastery of vocalism, and of performing! In seven minutes he sings through the entire story of Dorothy, Toto, and her friends in Oz, and brings the entire audience into his performance.

When I was in college, my choir conductor used to talk about 'completing the circle' between performer and audience. If you have ever given a performance (musical or otherwise), you might know what I mean. The key ingredient in a transcendent performance is an audience who becomes as deeply invested and involved in the performance as the performer herself. Often it takes the form of some sort of response: clapping, cheering, and sometimes, breathless silence at the end of a piece.

Here, Bobby McFerrin brings the audience into the performance. He cannot perform without them. That, my friends, is a perfect example of 'completing the circle.'

Tuesday, July 7, 2009

Miriam's Coconut Oatmeal Cookies


Last week when I went strawberry picking with my friend Miriam, she made these cookies to add to our picnic lunch at the berry farm. They were so tasty, I of course asked for the recipe.

My husband loves oatmeal cookies, and since I hadn't baked for a while I decided to give these a try. They looked super simple and called for ingredients that I had ready to go in my kitchen. I made a few modifications (I can't help it!) and popped them in the oven. We had plenty to take to our home group that evening, and lots left over to snack on for the next few days. Although I'm pretty sure I ate about four with my afternoon tea, reading The Guernsey Literary and Potato Peel Pie Society.

The coconut gives these cookies a beautiful fragrance and well-rounded taste. The oatmeal, Jordan swears, keeps the cookies soft. There is just enough flour and egg to hold the two predominant ingredients together.


Miriam's Coconut Oatmeal Cookies
1 cup butter, softened (I prefer room temperature, so I leave the butter on the counter overnight or all morning)
1 cup brown sugar
2 eggs
1 tsp vanilla
1 1/2 cups flour
2 tsp baking powder
1/2 tsp baking soda
2 cups oatmeal
1 cup shredded, unsweetened coconut

Heat oven to 350 degrees Fahrenheit.

Cream the butter and sugar together until smooth. Add the eggs and vanilla and beat until smooth. Add the flour, baking powder, and baking soda and stir until just combined. Add the oatmeal and coconut and stir until just incorporated.

Drop by tablespoonfuls onto an ungreased cookie sheet, leaving about an inch between each cookie, as they will spread a bit. Bake for 12 minutes, until the edges are just golden brown.

Eat warm with lots of cold milk.

Makes about 3 dozen cookies.