Showing posts with label snacks. Show all posts

Saturday, September 11, 2010

Plate of Love Part 2: Raspberry Yogurt Cake


As promised... (ahem, nevermind that I promised this months ago) the cake I love to make, using Clotilde's recipe for Gâteau au Yaourt which she makes with raspberries. Of course I've made my own adjustments, since the genius of this French staple is that you buy a tub of yogurt, and then use that as your measuring cup for all the other ingredients. Children love to make it. I've adjusted it to my North American measuring cups and baking habits. But it is essentially the same kind of cake: fragrant, moist, fluffy, and it has raspberries! Which are quite possibly the best fruit in the world. 

I made it in June, with raspberries, and I made it today. 

But today, I fiddled with it. I wanted to save some raspberries, my stash being very-plundered and not-yet-replenished, but I also wanted to make room in my freezer for the glut of blackberries I hope to pick in the next few weeks. And I had no yogurt! 

What's a girl to do? 

Marionberry Buttermilk Cake. Naturally

I know, you're shaking your heads at me ("Can't that girl leave well enough alone?"), but I can't help it! Who wants their cake to be the same every time? And I love taking the risk - although it's a very slight risk - of trying something new and seeing if it turns out as well as I hope it will. 

Judging by the fragrance coming from my kitchen right now, I think it has turned out. I'm taking it to a BBQ tonight, and my friends know well enough by now that I only experiment on people I love. 

So today, instead of just one recipe for Clotilde's Raspberry Yogurt Cake, you're getting two. 

Raspberry Yogurt Cake (à la Clotilde)

Preheat your oven to 350˚ Fahrenheit. 

Butter and flour an 8 or 9 inch tart, cake, or pie pan. Set aside. 

In a medium bowl, whisk together: 
1 cup plain yogurt
1 cup brown sugar
1/4 cup oil 
3 eggs
1/4 tsp vanilla extract

In another small bowl, whisk together: 
1 1/2 cups all-purpose flour
1/4 - 1/2 cup ground almonds (you can do this in your food processor or blender)
1 Tbsp baking podwer
1/2 tsp salt

Gently stir together both wet and dry ingredients, until full incorporated. Do not overmix. 

Pour half your batter into your prepared pan, and use a rubber spatula to smooth the batter to the edges of the pan. Cover the batter with 3-4 handfuls of fresh or frozen raspberries (or 1-2 cups, if you must measure), then pour the rest of the batter over, once again smoothing it with a spatula. 

Sprinkle a coarse-grained sugar (such as raw cane sugar or demerera sugar) over the top of the batter. 

Bake at 350˚ for 45-50 minutes, until the top of the cake is golden brown, the cake is puffed and slightly cracked, and doesn't wiggle when you shake it. (Trust me, this test does work!) Clotilde suggests that if the top is browning too quickly, then tent it with foil to finish baking. 

Let cool. Serve room temperature, with lightly sweetened, floppy whipped cream. 

Marionberry Buttermilk Cake

Substitute buttermilk for yogurt. 
Substitute marionberries for raspberries. 

Proceed as with the other cake. 

Wednesday, September 8, 2010

B3 Muffins

This weekend Jordan and I went down to Washington to visit my mom. Before we left, we had a pile of bananas threatening to go completely brown and soft on us, so I did what was only right to save the bananas from their imminent mushy death and our apartment from a new infestation of fruitflies: I baked muffins!

I have made these muffins, in some incarnation, at least a couple times a month for the last year. They're hearty yet light, fragrant, fruity with bananas and blueberries. And, I have the distinct pleasure of knowing how nutritious and delicious they are. They keep well in the fridge for up to a week, but I bet they won't last that long.

I like making them in a couple of sizes. I have a mini-loaf pan, which I bought under the influence of the Morning Glory muffins at the Mix Bakery down our street. These mini-loaves are big enough for a hearty breakfast. And, I also make a "snack size" muffin, either in a regular muffin tin, or a tartlette pan, which is what I used this time.

A number of people have asked for the recipe for these muffins, including my mother. So, Mom. This is for you.

Tora's B3 Muffins (Banana, Blueberry, Buttermilk)
The trick with these muffins is to customize them to your taste and your pantry. I use the ratios of dry-to-wet ingredients as my baseline. Use what you have! If you don't have bananas, use applesauce and make a little cinnamon strudel topping. If you don't have buttermilk, use yogurt. Is it near Thanksgiving? Use cranberries and pureed pumpkin instead of blueberries and bananas. You could substitute any other grain for the flaxseed or soy flour... spelt, quinoa, or amaranth flours would all be lovely here. Your imagination is the limit!


Preheat your oven to 350 degrees Fahrenheit.

In a large bowl, stir together your dry ingredients:
2 cups all-purpose flour
1/2 cup whole wheat flour
1/2 cup rolled oats
1/2 cup wheat germ or wheat bran (optional... or just use oats instead)
1/3 cup brown sugar
1/4 cup flaxseed meal (optional... I use Bob's Red Mill)
3 Tbsp soy flour (also optional... I use Bob's Red Mill)
3 tsp baking powder
1 tsp baking soda
1/2 tsp salt
dash of ground nutmeg, cinnamon, and cloves (to taste)
1/2 cup - 1 cup of chopped nuts (optional too... and I like walnuts)


Stir together with a whisk until thoroughly incorporated. (I like to use my hands.) Set aside.


In a separate medium bowl, mix together your wet ingredients:
1 large or 2 small-to-medium ripe bananas, peeled and mashed with a fork (I leave them a little chunky)
1 cup buttermilk or yogurt (if you use sweetened yogurt, decrease the amount of sugar used above)
2 eggs
3 Tbsp oil or melted and cooled butter
3 Tbsp molasses (optional)
1 tsp vanilla


Whisk together until smooth, but do not over-beat! Set aside.

Line your muffin tins with paper liners OR grease them well with butter.

Pour the wet ingredients into your dry ingredients and stir until just incorporated. Add 1-2 cups fresh or frozen blueberries to the batter, and fold in. DO NOT OVERMIX or your muffins will get tough, chewy, and lose that lovely tenderness of crumb.

Spoon the batter into your pans, and bake for 20-25 minutes, depending on the size of your muffin pans, until the tops are golden brown. (I bake mini-loaves for 25 minutes or more, and the smaller muffins for only 20.)

Set the pan on a cooling rack and let cool for 5-10 minutes before removing muffins from pans.

Serve warm with butter.

Thursday, June 24, 2010

Plate of Love Part 1: Spicy Maple-Glazed Pecans


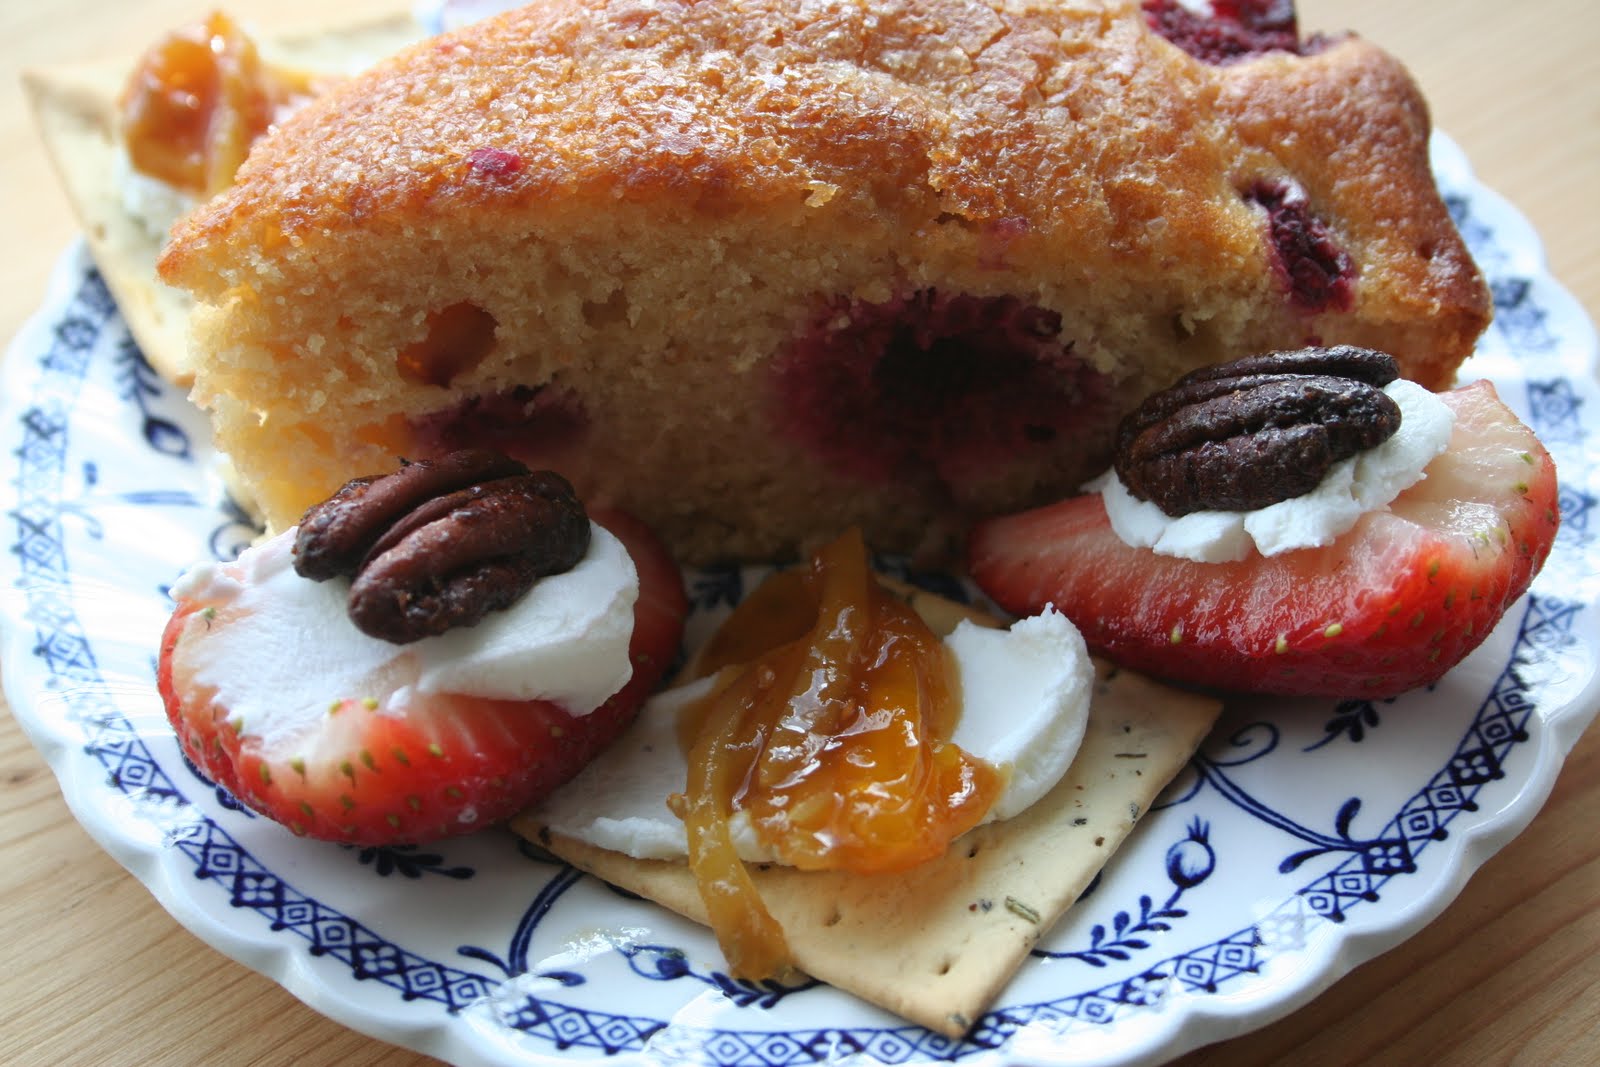
I made this as a snack for Jordan the other day.

I was jealous.

The cake is a Raspberry Yogurt Cake, inspired by Clotilde at Chocolate & Zucchini, has become one of my favorite summer afternoon tea-cakes. It is light, buttery, spotted with fresh, juicy raspberries, and topped with crunchy, caramelized coarse-grained demerera sugar. Because of the moisture and richness provided by the yogurt added to this cake, it requires a lot less butter than most cakes. And, if you use sweetened yogurt you can drop the sugar level down quite a bit, too.

The crackers are simple rosemary-garlic snack crackers, with a mild enough flavor to support toppings. They are topped with soft goat cheese and last summer's savory-jam-experiment, my Golden Cherry Tomato and Ginger jam.

The strawberries... oh! the strawberries! They were the first organic strawberries to arrive in the market this season, and they are sliced in half and stuffed with the same soft goat cheese. But the crowning piece to this amuse-bouche are the Spicy Maple-Glazed Pecans.

I must have had a particularly inspired afternoon, because these turned out amazingly (and surprisingly!) well in the first attempt. They are sweet, spicy, crunchy, buttery, with layers and layers of flavors that may make you ask... "Is that balsamic vinegar I taste?" I first made the pecans to provide some crunch to a spinach salad that included strawberries, that lovely goat cheese, and a herby vinaigrette. However, as soon as they came out of the oven, Jordan and I started snacking on them, and frankly... we couldn't stop! I trust you won't be able to either. Wasn't it that Pringles ad that challenged, I dare you to eat just one?

This is the recipe you're getting today. I will post my recipes for the tomato-ginger jam and the cake soon.

Spicy Maple-Glazed Pecans

Line a large, rimmed baking sheet with parchment paper. Brush the parchment paper with melted butter. (Trust me on this one.) Preheat your oven to 500 degrees Fahrenheit... basically you will be broiling these.

In a bowl, mix together until smooth:
1/2 cup brown sugar
1 tsp ground cinnamon
1/2 tsp ground cloves
1/4 tsp cayenne pepper
1/2 tsp salt
1/2 tsp black pepper
1/4 cup maple syrup
2 Tbsp balsamic vinegar

Fold in, tossing gently so as not to break the halves into smaller pieces:
2 - 2 1/2 cups pecan halves

Broil for four minutes. Stir or turn over the pecan pieces carefully; they will be very hot and bubbly! Broil for one more minute on the other side.

Let the pan cool completely before serving. They will get crunchier as they cool.

Friday, July 3, 2009

a sherwood forest of baking possibilities


My in-laws have been visiting this week, and that means lots of good eating. J.'s parents are famous in my book for their fabulous Sunday crepe lunches, where J.'s dad does the crepe-flipping like a pro, and his mum sets out her white sauce, fruit sauce, fruit salad, and of course, the cottage cheese.

Of course, you have to eat something mid-week. So I had prepared some sourdough-type, Amish-friendship-cake-y bread/pastry/quiche/biscuit starter from a recipe given to my from a friend. The dough is cleverly called Sherwood, as the recipes came from a Robin Hood flour cookbook. Little did I know that this bowl of bubbling dough in my fridge would feed us all week and become a staple to this family visit. I have made cheese biscuits... twice. And scones... twice. And a breakfast quiche. All from one batch of Sherwood. And I still had a cup left over to start a new batch.

We took mum and dad kayaking in Deep Cove on Canada Day, and we had a grand time. The weather was perfect for kayaking - clear and sunny, warm enough to kayak in a tee shirt, just enough breeze to keep you cool and to add a little excitement to the kayaking (a wave washed over the stern of our double kayak and down J.'s back!). But, since we had gotten up early and had worked hard for two hours, we came home and promptly took long, Canada Day afternoon naps. Then, I baked these scones for tea.

I wasn't working with a scone recipe... I was adapting a recipe for cheese biscuits. But I thought to myself... biscuits and scones really aren't that far apart on the pastry continuum, how hard can it be? So I took a cup of the 'Sherwood' starter, some oranges given to me from a friend-going-on-holidays-and-cleaning-out-her-fridge, and some dried currants that desperately wanted to be baked into scones, and went from there.

These scones, in my opinion, were my biggest success, because I've always been afraid of making scones. Too much cold-butter-cut-into-the-flour, folding-and-rolling, perfect-temperature fuss for me. But, because the moisture in these scones comes primarily from the liquid starter, it requires a lot less butter-fuss than a traditional scone recipe.
Once you get the starter dough set up in your fridge, the rest of it is easy. The trick is not to forget to stir your 'Sherwood' every day, and to feed it every 5 days. But, it seems to be a forgiving kind of dough. I fed it a day late and forgot to stir it for two days, but each recipe turned out just fine. I'll post the cheese biscuits and breakfast quiche recipes in a future post.

Orange Currant Scones

1 cup all-purpose flour
2 1/2 tsp baking powder
1/2 tsp baking soda
1/2 tsp salt
zest of one small orange
1 cup dried currants
juice of one small orange
1 cup 'Sherwood' sourdough starter
1/4 cup melted butter
1/4 cup raw cane or turbinado sugar (as long as it's large grain)

Preheat oven to 425 degrees Fahrenheit.

In a small bowl, combine the cup of currants with the orange juice. Microwave for one minute, and stir. This will plump up the currants if they are dry like mine were (and not the good kind of dry... but the hard, totally-withered-beyond-edibility kind of dry). Set aside.

In a large bowl, whisk together flour, baking powder, baking soda, salt, and orange zest. (I used a zester - a little hand-gadget that looks like teeny brass knuckles - to peel beautiful long strips of the zest off the orange, but you can use a box grater or microplane and get good results. But the zester will be prettier.) Add the orange-soaked currants, but reserve the juice. (A slotted spoon helps here.) Stir until all the zest slivers and currants are coated in flour.

Add your Sherwood and the melted butter. Stir until the dough just comes together. Turn out onto a lightly floured counter and knead about 5 times. Pat or roll out the dough into a long rectangle, and cut into scone shapes. (Usually triangles, but you can really do whatever you like. Mickey Mouse heads... snowmen...) Place on an ungreased baking sheet.

Brush the tops of the scones with the reserved orange juice. Sprinkle with a large-grain sugar, preferably turbinado or raw cane sugar.

Bake for 8-10 minutes until the tops are crusty and golden brown. Serve warm, with butter and maybe the slightest drizzle of honey.

Here is the recipe for the Sherwood starter. It's really simple - and you can keep it going indefinitely in your own fridge. You can also share it with friends a cup at a time, with the instructions to go along with it. It's also a good idea to give them the extra recipes for what to do with Sherwood once they have it going. Once you get the hang of all the different things you can do with it, let your imagination run wild!

Sherwood
adapted from Robin Hood Baking Festival recipes

On Day One: assemble the starter.
1 tsp sugar
1/2 cup plus 1 and 1/2 cups warm water
1 package (2-3 tsp) active dry yeast
2 cups all-purpose flour

Proof the yeast by dissolving the sugar in a 1/2 cup of the warm water. Sprinkle the yeast in and let it stand 10 minutes. You'll see it bubbling a bit. This is a good sign - it means you have a live yeast culture!
Add the rest of the water and the flour. Beat it until smooth. Cover tightly and leave overnight at room temperature.

On Day Two: feed your starter.
1 cup all-purpose flour
1 cup milk
1/2 cup sugar
Stir until smooth. Cover loosely and refrigerate.

On Day Three: stir.

On Day Four: stir.

On Day Five: feed your starter
1 cup all-purpose flour
1 cup milk
1/2 cup sugar
Stir until smooth and return to the refrigerator.

On Day Six: stir.

On Day Seven: stir.

On Day Eight: stir.

On Day Nine: stir.

On Day Ten: time to have fun!
Take a cup of Sherwood and give it to a friend, with accompanying instructions on how to care for it from Day Two until Day Ten. If you want to have a continuous supply in your own fridge, reserve a cup for yourself and feed it as you did from Day Two until Day Ten. This means you will have two separate bowls going - one that is ready to be baked into amazing things, and another that is getting ready to be baked in about 10 days.

Wednesday, February 25, 2009

Snowboarding SnackPacks

Okay, okay, I get the picture. Post a new recipe already, Tora!

Last week some friends of ours flew in from Toronto for a weekend of skiing at Whistler. I was more excited to "play mom" than to get my rear end flattened and my knees knocked out by hard-packed snow. This is only my second season boarding, you know. Give me a break. However, being a dutiful wife to my snowboarding husband, I got up at 6.00am with everyone else to drive up to Whistler for a day on the slopes.

Wouldn't you know it? I barely made it down one run. One green run, nonetheless. By lunchtime I was ready to call it a day and go sip cocoa in front of a TV while wearing warm clothes. Oh, and get the feeling back in my toes.

But, the highlights of the day were: beautiful clear blue skies, a comfortable temperature, good friends, stunning views from the Peak2Peak Gondola, and tasty snacks. On the ride up we had blueberry-banana muffins topped with a oaty-cinnamony-brown-sugary streusel, and I sent everyone up the lifts with snackpacks of homemade granola bars and sugar baby mandarins.


So, my friends. Today, as penance for not posting since November 24 (shame, I know), you will get two recipes. For the days ahead of skiing and snowboarding which I hope will come to all of us. I, however, plan to stick to the local mountains (Seymour, Grouse, Cypress) in hopes of mastering the bunny hills by the end of this season so I don't continue this trend of breaking myself attempting to slide down a hill while nailed to a plank of wood, trying desperately to look cool.

Road-Trip Blueberry Banana Muffins

1 1/2 cups all-purpose flour
1/2 cup whole wheat flour
3 tsp baking powder
1 tsp baking soda
1/2 tsp salt
1/4 cup brown sugar

Preheat the oven to 350 degrees Fahrenheit. Whisk together dry ingredients in a medium bowl. Set aside. In a small bowl, using a pastry cutter, blend the following until it forms pea-sized lumps:

1/3 cup oats
1/3 cup whole wheat flour
1/3 cup brown sugar
1/3 cup butter, softened
dash of cinnamon

Set the streusel mixture aside. In a large bowl, whisk together:

1 large ripe banana, peeled and mashed
1 cup buttermilk
2 eggs
3 Tbsp oil
1 tsp vanilla

Stir the dry ingredients into the banana-buttermilk mixture, until it is just mixed. DO NOT OVERMIX! Fold in:

1 cup fresh or frozen blueberries

Spoon the batter into greased muffin tins. Top each muffin with a teaspoon of streusel, patting it down gently so it just sticks to the batter.

Bake muffins for 20-25 minutes until the muffins are puffy and the streusel is golden brown and you just can't wait any longer to eat them.

ALTERNATIVE RECIPE:
To make apple-streusel muffins, substitute one cup of unsweetened applesauce for the banana, and add 1 tsp of cinnamon to the flour mixture. Top with streusel and bake just as for the blueberry-banana muffins.


Granola Bars (to make you swear off Chewy forever)
adapted from a forum post on 101cookbooks.com

Preheat oven to 325 degrees Fahrenheit. In a large bowl, stir together:

4 cups old-fashioned rolled oats
1/2 cup whole-wheat flour
1/2 cup unbleached all-purpose flour
1/3 cup brown sugar
1 tsp baking soda
1 tsp cinnamon
1 tsp salt
1/2 cup shredded unsweetened coconut
1 cup of dried fruit of your choice (I like cranberries, but cherries, blueberries, or raisins would all work fine here)
1 cup of nuts, whole or lightly chopped (I like whole almonds, but peanuts, cashews, pecans, hazelnuts, would all be delicious!)
1/3 cup chopped chocolate-covered espresso beans (optional... but highly recommended)

In a pyrex liquid measuring glass, stir together:

1/2 cup butter, cut into chunks
2/3 cup honey
1/2 cup peanut or almond butter

Microwave for a few minutes until you can stir it into a smooth mixture. Add:

2 tsp vanilla

Pour the liquid honey/butter/peanut butter mix over the dry oat mixture, tossing to coat everything evenly (this is to ensure your bars stick together!). Pour the mixture into a 9 inch X 13 inch pan, lined with parchment paper (or greased and floured... but you don't really want more grease in these bars), leaving enough paper hanging over for you to pull the bars out of the pan. Press down firmly on the mixture to make sure it will stick together.

Bake at 325 degrees Fahrenheit for 20-25 minutes. Let the pan cool on a rack for 10 minutes. Then, getting your roommate, husband, or boyfriend to help, grab two opposite sides of the parchment paper while s/he grabs the other side (a large spatula slid under the bars helps immensely), and lift the bars out of the pan and let them cool on a rack (still on the paper) until they are completely cool and set.

Cut into small-ish sized bars and wrap in plastic or tinfoil. I underestimated the richness of my bars, and so cut pretty large ones. Taste a bit of yours before you cut so you know how much you can stand to eat in one sitting. These are pretty packed with energy!